Videostream There Was an Error Reading From That Directory
This article is a quick getting started guide for the ESP32-CAM board. We'll show yous how to setup a video streaming web server with face recognition and detection in less than 5 minutes with Arduino IDE.

Note: in this tutorial we use the example from the arduino-esp32 library. This tutorial doesn't embrace how to modify the example.
Related projection: ESP32-CAM Video Streaming Web Server (works with Home Banana and Node-Red)
Watch the Video Tutorial
You tin watch the video tutorial or proceed reading this folio for the written instructions.
Parts Required
To follow this tutorial you demand the post-obit components:
- ESP32-CAM with OV2640 – read Best ESP32-CAM Dev Boards
- FTDI developer
- Female-to-female jumper wires
You lot tin can use the preceding links or go straight to MakerAdvisor.com/tools to find all the parts for your projects at the best price!

Introducing the ESP32-CAM

The ESP32-CAM is a very small-scale camera module with the ESP32-S chip that costs approximately $10. Besides the OV2640 camera, and several GPIOs to connect peripherals, information technology also features a microSD menu slot that can be useful to store images taken with the camera or to shop files to serve to clients.
The ESP32-CAM doesn't come up with a USB connector, so yous need an FTDI programmer to upload code through the U0R and U0T pins (serial pins).

Features
Here is a listing with the ESP32-CAM features:
- The smallest 802.11b/g/n Wi-Fi BT SoC module
- Low power 32-bit CPU,can also serve the application processor
- Up to 160MHz clock speed, summary calculating ability up to 600 DMIPS
- Congenital-in 520 KB SRAM, external 4MPSRAM
- Supports UART/SPI/I2C/PWM/ADC/DAC
- Support OV2640 and OV7670 cameras, born flash lamp
- Support prototype WiFI upload
- Back up TF card
- Supports multiple sleep modes
- Embedded Lwip and FreeRTOS
- Supports STA/AP/STA+AP operation mode
- Back up Smart Config/AirKiss engineering
- Back up for serial port local and remote firmware upgrades (FOTA)
ESP32-CAM Pinout
The following effigy shows the ESP32-CAM pinout (AI-Thinker module).
There are three GND pins and two pins for power: either three.3V or 5V.
GPIO 1 and GPIO 3 are the serial pins. You need these pins to upload code to your board. Additionally, GPIO 0 also plays an of import role, since it determines whether the ESP32 is in flashing mode or not. When GPIO 0 is connected to GND, the ESP32 is in flashing fashion.
The post-obit pins are internally connected to the microSD carte du jour reader:
- GPIO 14: CLK
- GPIO xv: CMD
- GPIO ii: Data 0
- GPIO iv: Data i (too connected to the on-board LED)
- GPIO 12: Data 2
- GPIO 13: Data 3
Video Streaming Server
Follow the next steps to build a video streaming web server with the ESP32-CAM that y'all can admission on your local network.
Important: Brand sure you have your Arduino IDE updated as well as the latest version of the ESP32 addition.
1. Install the ESP32 addition
In this example, we utilize Arduino IDE to program the ESP32-CAM board. So, you need to have Arduino IDE installed as well as the ESP32 improver. Follow i of the side by side tutorials to install the ESP32 improver, if you haven't already:
- Installing the ESP32 Lath in Arduino IDE (Windows instructions)
- Installing the ESP32 Lath in Arduino IDE (Mac and Linux instructions)
ii. CameraWebServer Example Code
In your Arduino IDE, get to File > Examples > ESP32 > Photographic camera and open the CameraWebServer example.

The post-obit code should load.

Earlier uploading the lawmaking, you demand to insert your network credentials in the following variables:
const char* ssid = "REPLACE_WITH_YOUR_SSID"; const char* password = "REPLACE_WITH_YOUR_PASSWORD"; Then, brand certain y'all select the right photographic camera module. In this example, nosotros're using the AI-THINKER Model.

So, comment all the other models and uncomment this i:
// Select camera model //#define CAMERA_MODEL_WROVER_KIT //#define CAMERA_MODEL_ESP_EYE //#define CAMERA_MODEL_M5STACK_PSRAM //#define CAMERA_MODEL_M5STACK_WIDE #define CAMERA_MODEL_AI_THINKER If none of these correspond to the photographic camera you're using, you demand to add the pin consignment for your specific lath in the camera_pins.h tab.
At present, the code is set up to be uploaded to your ESP32.
3. ESP32-CAM Upload Code
Connect the ESP32-CAM board to your computer using an FTDI developer. Follow the next schematic diagram:
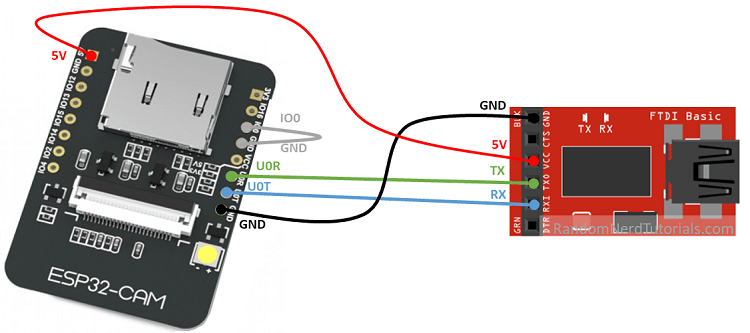
Many FTDI programmers have a jumper that allows y'all to select three.3V or 5V. Make sure the jumper is in the right place to select 5V.
Important: GPIO 0 needs to exist continued to GND so that you're able to upload lawmaking.
| ESP32-CAM | FTDI Programmer |
| GND | GND |
| 5V | VCC (5V) |
| U0R | TX |
| U0T | RX |
| GPIO 0 | GND |
To upload the lawmaking, follow the next steps:
1) Go to Tools > Board and select AI-Thinker ESP32-CAM.
2) Go to Tools > Port and select the COM port the ESP32 is connected to.
three) And then, click the upload button to upload the code.

4) When you start to see these dots on the debugging window every bit shown below, press the ESP32-CAM on-board RST button.

After a few seconds, the code should be successfully uploaded to your lath.
Getting the IP accost
Afterwards uploading the code, disconnect GPIO 0 from GND.
Open the Serial Monitor at a baud rate of 115200. Press the ESP32-CAM on-board Reset push.
The ESP32 IP address should be printed in the Serial Monitor.

Accessing the Video Streaming Server
Now, you can access your camera streaming server on your local network. Open a browser and type the ESP32-CAM IP accost. Press the Start Streaming push to start video streaming.

You also take the selection to have photos past clicking the Go All the same button. Unfortunately, this example doesn't salve the photos, but you can modify it to use the on board microSD Bill of fare to shop the captured photos.
There are also several camera settings that you tin play with to adapt the image settings.
Finally, y'all can practice face recognition and detection.

Commencement, you demand to enroll a new confront. It will make several attempts to save the face. After enrolling a new user, it should find the face later on (subject 0).

And that's it. Now yous have your video streaming spider web server up and running with face up detection and recognition with the example from the library.
Troubleshooting
If y'all're getting any of the post-obit errors, read ourESP32-CAM Troubleshooting Guide: Most Mutual Issues Stock-still
- Failed to connect to ESP32: Timed out waiting for packet header
- Camera init failed with mistake 0x20001 or like
- Brownout detector or Guru meditation error
- Sketch too big error – Incorrect division scheme selected
- Board at COMX is non available – COM Port Not Selected
- Psram mistake: GPIO isr service is not installed
- Weak Wi-Fi Signal
- No IP Address in Arduino IDE Serial Monitor
- Tin't open web server
- The image lags/shows lots of latency
Wrapping Up
The ESP32-CAM provides an inexpensive style to build more avant-garde home automation projects that feature video, taking photos, and face recognition.
In this tutorial we've tested the CameraWebServer example to test the photographic camera functionalities. Now, the thought is to change the example or write a completely new code to build other projects. For example, take photos and save them to the microSD menu when motion is detected, integrate video streaming in your domicile automation platform (like Node-Ruby or Dwelling Assistant), and much more than.
We hope you've find this tutorial useful. If you don't have an ESP32-CAM yet, yous can grab it hither.
If you like this project, you may too similar other projects with the ESP32-CAM:
- ESP32-CAM Video Streaming Spider web Server (works with Dwelling Banana and Node-Cherry-red)
- ESP32-CAM Take Photo and Salve to MicroSD Carte
- ESP32-CAM PIR Motion Detector with Photograph Capture (saves to microSD carte du jour)
- ESP32-CAM Take Photo and Brandish in Web Server
- Build ESP32-CAM Projects (eBook)
- Read all our ESP32-CAM Projects, Tutorials and Guides
Source: https://randomnerdtutorials.com/esp32-cam-video-streaming-face-recognition-arduino-ide/
0 Response to "Videostream There Was an Error Reading From That Directory"
Post a Comment